Connecting your OBD2 scanner to your vehicle’s ECU (Engine Control Unit) might seem daunting, but it’s actually a simple process. This guide will walk you through everything you need to know, from understanding the basics to troubleshooting common issues.
Understanding the OBD2 and ECU Connection
Before we dive into the connection process, let’s clarify what OBD2 and ECU are and how they interact. OBD2, or On-Board Diagnostics, is a standardized system that allows external devices, like scanners, to access your vehicle’s diagnostic information. The ECU, on the other hand, is the brain of your car’s engine management system. It constantly monitors and controls various engine parameters, ensuring optimal performance.
The OBD2 port acts as a communication gateway between your vehicle’s ECU and the outside world. By connecting an OBD2 scanner to this port, you can tap into a wealth of data about your engine’s health, performance, and potential issues.
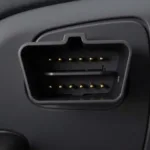
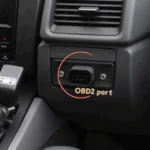
Locating Your OBD2 Port
The first step is to locate your vehicle’s OBD2 port. In most cars manufactured after 1996, it’s located under the dashboard on the driver’s side, usually within reach of the steering wheel. However, the exact location can vary depending on the make and model.
If you’re having trouble finding it, refer to your vehicle’s owner’s manual or do a quick online search.
Connecting Your OBD2 Scanner
Once you’ve located the OBD2 port, connecting your scanner is a breeze:
- Turn off your vehicle’s ignition. This ensures safety and prevents any electrical mishaps.
- Align the scanner’s connector with the port and gently push it in until it clicks, indicating a secure connection.
- Turn on your vehicle’s ignition but do not start the engine. This powers up the scanner and allows it to establish communication with the ECU.
- Turn on your OBD2 scanner. The scanner will initialize and begin communicating with your vehicle’s ECU.
Troubleshooting Connection Issues
While connecting an OBD2 scanner is generally straightforward, you might encounter occasional hiccups:
- Scanner Not Powering On: Ensure your vehicle’s ignition is turned to the “On” position. If it still doesn’t power on, check the scanner’s fuse or try a different power source.
- No Communication with ECU: Double-check the connection between the scanner and the OBD2 port. Make sure the pins are aligned correctly and the connection is secure. If the issue persists, there might be a problem with the OBD2 port itself, requiring professional inspection.
- Error Codes Displayed: Don’t panic! Error codes are actually helpful. They pinpoint potential issues within your vehicle’s system. You can look up these codes online or consult your vehicle’s repair manual for detailed explanations.
If you’re experiencing persistent connection problems or encountering error codes you can’t decipher, it’s best to seek assistance from a qualified mechanic or automotive electrician.
Leveraging Your OBD2 Scanner
Connecting your OBD2 scanner to the ECU is just the first step. Once connected, you can unlock a world of information about your vehicle’s performance, diagnose potential problems, and even customize certain settings.
For instance, you can monitor live data streams, read and clear error codes, perform emissions tests, and even access manufacturer-specific data depending on your scanner’s capabilities.
Conclusion
Connecting your OBD2 scanner to your vehicle’s ECU is a simple yet powerful way to gain insights into your car’s health and performance. By following these steps and understanding the basics, you can easily tap into a wealth of diagnostic information and take control of your vehicle’s maintenance.
Remember, while an OBD2 scanner can provide valuable information, it’s essential to consult with a qualified mechanic for any serious repairs or diagnostic assessments.