The Geo Tracker, a compact SUV known for its off-road capabilities, has intrigued many with the question, “what year Geo Tracker OBD2?”. Understanding OBD2 compliance is crucial for diagnostics and maintenance. This guide will delve into the specifics of OBD2 in Geo Trackers, covering everything from the implementation year to practical applications.
Understanding OBD2 and Its Importance in Geo Trackers
OBD2, or On-Board Diagnostics II, is a standardized system that allows external devices to access a vehicle’s diagnostic data. This system revolutionized vehicle maintenance by providing a common interface for retrieving trouble codes, monitoring sensor data, and performing various diagnostic tests. Knowing which year your Geo Tracker became OBD2 compliant is essential for choosing the right diagnostic tools and understanding its capabilities.
For Geo Trackers, OBD2 compliance began in 1996. This means that all Geo Trackers manufactured from 1996 onwards are equipped with the OBD2 system. Prior to 1996, these vehicles utilized OBD1, a less standardized and more manufacturer-specific system.
Having access to the OBD2 system in your Geo Tracker offers several advantages. It allows you to quickly identify the source of a check engine light, monitor engine performance, and even access data like fuel economy and emissions.
After 1996, the implementation of OBD2 became standardized across nearly all vehicle manufacturers, greatly simplifying the diagnostic process. Understanding this standardization is crucial for anyone working with Geo Trackers and other vehicles. This standardization led to the development of readily available and affordable OBD2 scanners.
Identifying the OBD2 Port in Your Geo Tracker
Locating the OBD2 port in your Geo Tracker is typically straightforward. In most models, the port is situated under the dashboard, near the steering column. It’s a 16-pin trapezoidal connector, often covered by a small plastic cap.
If you’re having trouble locating the port, consult your owner’s manual, as it should provide a diagram or instructions.
2000 ford f350 obd2 wiring diagram
Using an OBD2 Scanner with Your Geo Tracker
Once you’ve located the OBD2 port, using a scanner is a simple process:
- Turn the ignition key to the “on” position, but do not start the engine.
- Plug the OBD2 scanner into the port.
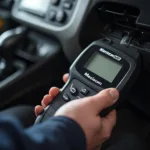
- Turn on the scanner and follow the on-screen prompts to read or clear codes, view live data, or perform other diagnostic functions.
Knowing what information your OBD2 scanner can provide offers you a greater understanding of your vehicle’s health. This knowledge can empower you to address issues proactively and maintain your Geo Tracker effectively.
2003 chevy suburban obd2 wiring harness diagram
What if My Geo Tracker is Older than 1996?
Geo Trackers produced before 1996 are not OBD2 compliant. They use OBD1, which requires different diagnostic tools and procedures. While information about OBD1 systems can be more difficult to find, resources are still available online and in specialized manuals.
Understanding the differences between OBD1 and OBD2 is essential for accurately diagnosing and addressing issues in your Geo Tracker, regardless of its model year. Proper diagnosis ensures you’re using the correct tools and procedures for your vehicle.
Why is knowing “what year Geo Tracker OBD2?” important?
Knowing the OBD2 compliance year of your Geo Tracker is crucial for several reasons:
- Choosing the right diagnostic tools: OBD2 scanners are designed to work with OBD2 compliant vehicles. Using the wrong scanner on an older Geo Tracker will not yield accurate results.
- Understanding diagnostic capabilities: OBD2 offers more comprehensive diagnostic capabilities than OBD1. Knowing what your system is capable of will help you utilize its features effectively.
- Troubleshooting and maintenance: OBD2 simplifies troubleshooting and maintenance by providing access to a wealth of data about the vehicle’s systems.
![]() Geo Tracker Engine Diagnostics
Geo Tracker Engine Diagnostics
05 dodge 3500 obd2 wiring diagram
Conclusion: Empowering Geo Tracker Owners with OBD2 Knowledge
Understanding “what year Geo Tracker OBD2?” is fundamental for any owner. Knowing your Geo Tracker’s OBD2 compliance year, 1996 and later, empowers you to effectively utilize diagnostic tools, understand its capabilities, and perform essential maintenance. This knowledge ensures a smooth and informed ownership experience.
FAQ
- What is OBD2? OBD2 stands for On-Board Diagnostics II and is a standardized system for accessing vehicle diagnostic data.
- When did Geo Trackers become OBD2 compliant? 1996.
- Where is the OBD2 port located in a Geo Tracker? Typically under the dashboard near the steering column.
- What can I do with an OBD2 scanner? Read and clear trouble codes, view live data, and perform other diagnostic tests.
- What if my Geo Tracker is older than 1996? It uses OBD1, requiring different diagnostic tools.
- Why is knowing the OBD2 compliance year important? It helps you choose the correct diagnostic tools and understand your vehicle’s capabilities.
- Where can I find more information about OBD2? Online resources, specialized manuals, and automotive forums.
Common Situations and Questions
- Check Engine Light: If your Check Engine Light is illuminated, an OBD2 scanner can help you determine the cause.
- Performance Issues: If your Geo Tracker is experiencing performance problems, such as rough idling or reduced fuel economy, an OBD2 scanner can help pinpoint the issue.
- Maintenance: Regularly checking your Geo Tracker’s systems with an OBD2 scanner can help you identify potential problems before they become major issues.
Further Exploration
For more information related to OBD2 wiring diagrams for different vehicles, please visit our website’s resources on 2000 Ford F350 OBD2 wiring diagrams, 2003 Chevy Suburban OBD2 wiring harness diagrams, and 2005 Dodge 3500 OBD2 wiring diagrams.
Need help? Contact us via WhatsApp: +1(641)206-8880, Email: [email protected], or visit our office at 789 Elm Street, San Francisco, CA 94102, USA. Our customer service team is available 24/7 to assist you.

