Understanding the intricacies of OBD2 wiring during an LS swap is crucial for a successful engine conversion. This guide provides a detailed walkthrough of the process, addressing common challenges and offering expert insights.
Swapping an LS engine into an older vehicle offers significant performance gains, but integrating the modern engine management system with the existing chassis wiring can be complex. One key aspect is the OBD2 wiring, which is essential for diagnostics and proper engine function. Successfully navigating the OBD2 wiring ensures your swapped LS engine runs smoothly and communicates effectively with diagnostic tools. This guide will help you understand the key components, common issues, and best practices for a seamless LS swap OBD2 wiring experience. You may find our guide on ls swap obd2 port wiring diagram helpful for a visual representation of this process.
Decoding the OBD2 System in an LS Swap
The OBD2 system is the backbone of modern engine management, providing valuable data for diagnostics and performance tuning. When performing an LS swap, understanding the OBD2 system’s role is paramount. It’s more than just a diagnostic port; it’s the communication hub for your engine and various vehicle systems. This section will delve into the core components of the OBD2 system within the context of an LS swap.
Key Components of the OBD2 System
- ECU (Engine Control Unit): The brain of the operation, the ECU controls all engine functions based on sensor inputs and pre-programmed parameters.
- Wiring Harness: This intricate network of wires connects the ECU to various sensors and actuators throughout the engine bay.
- Diagnostic Port: The physical interface for accessing diagnostic information and communicating with the ECU.
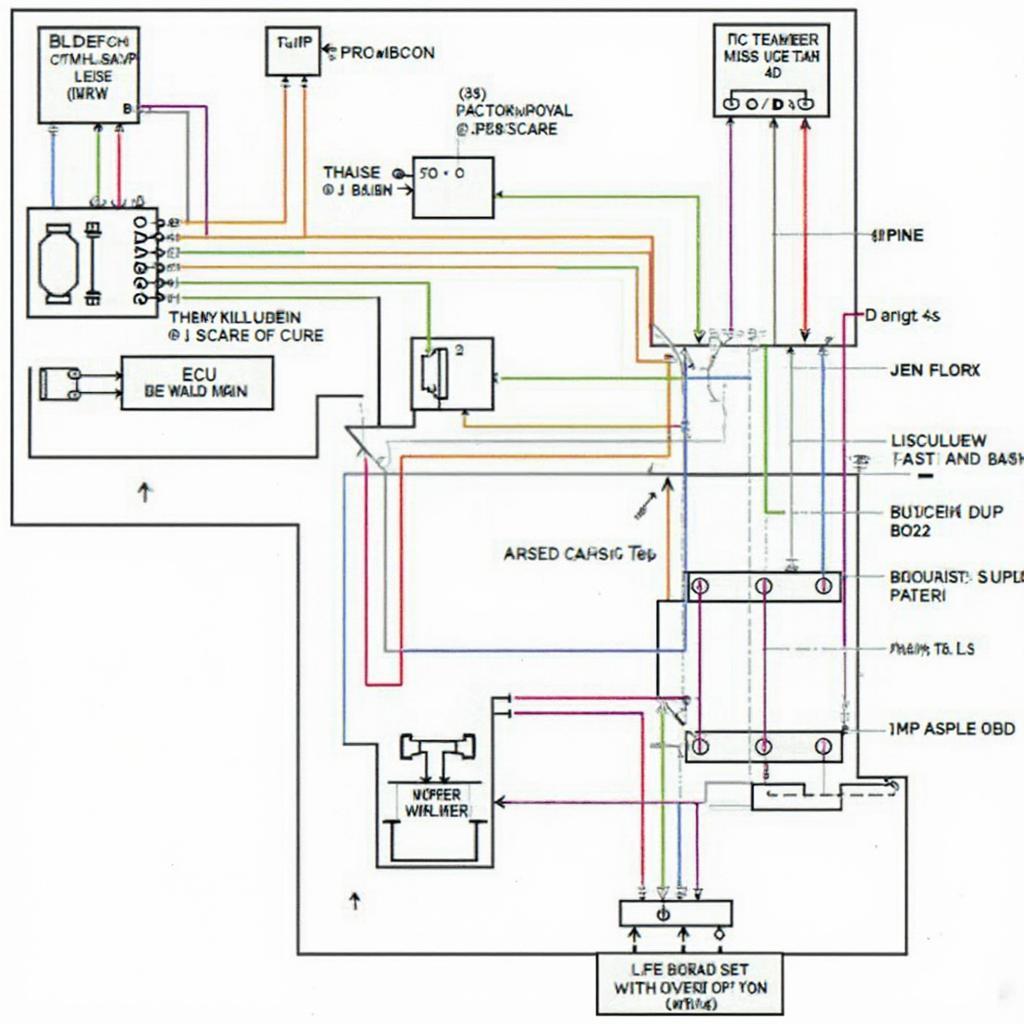 LS Swap OBD2 Wiring Diagram
Understanding these components and their interrelationships is essential for a successful LS swap. A properly wired OBD2 system ensures accurate data transmission and enables you to diagnose and address any potential issues quickly. For a specific example of LS1 wiring, check out our guide on how to wiring in obd2 ls1.
Common OBD2 Wiring Challenges in LS Swaps
While rewarding, LS swaps can present several OBD2 wiring challenges. These challenges often stem from integrating a modern engine management system into an older vehicle’s wiring. This section explores some common issues and provides solutions for a smooth conversion.
Mismatched Connectors and Wiring
One of the most frequent issues is dealing with mismatched connectors and wiring between the LS engine harness and the vehicle’s existing wiring. This requires careful planning and adaptation to ensure proper signal transmission.
Grounding Issues
Proper grounding is crucial for any electrical system, and the OBD2 system is no exception. Inadequate grounding can lead to communication errors and erratic behavior. Ensure all grounds are clean and securely connected.
Power Supply Problems
The OBD2 system requires a stable power supply. Insufficient or fluctuating voltage can cause diagnostic trouble codes and affect engine performance.
“A common oversight is the power supply to the OBD2 system,” says automotive expert Michael Stevens. “Ensure a dedicated and stable power source to avoid intermittent communication issues.”
Addressing these challenges proactively can save you time and frustration down the road. Thorough planning, meticulous wiring, and proper grounding are crucial for a successful LS swap. If you’re dealing with an older Honda, our guide on accord obd2 to obd1 might offer some relevant insights, even though the conversion direction is different.
Best Practices for OBD2 Wiring in LS Swaps
To ensure a smooth and successful LS swap, follow these best practices for OBD2 wiring:
- Use a Standalone Wiring Harness: A standalone harness designed specifically for LS swaps simplifies the process and ensures compatibility. You might find resources on ls seap harness obd2 useful in this regard.
- Verify Pinouts: Double-check all pinouts to ensure accurate connections between the engine harness and the vehicle’s wiring.
- Test Thoroughly: After completing the wiring, test the OBD2 system with a scan tool to verify proper communication.
“Invest in a high-quality wiring harness and take your time with the wiring process,” advises automotive engineer Sarah Miller. “Meticulous attention to detail is key to a successful LS swap.”
Conclusion
Successfully wiring the OBD2 system is critical for a successful LS swap. By understanding the system, addressing common challenges, and following best practices, you can ensure your swapped LS engine runs smoothly and communicates effectively with diagnostic tools. Proper OBD2 wiring unlocks the full potential of your LS swap, providing valuable insights into engine performance and enabling accurate diagnostics. Consider exploring resources on converting older systems like obd0 to obd2 distributor for a broader perspective on automotive electronics.
FAQ
- What is the purpose of the OBD2 system in an LS swap?
- What are the common OBD2 wiring issues in an LS swap?
- How can I prevent OBD2 wiring problems during an LS swap?
- What tools do I need for OBD2 wiring in an LS swap?
- Where can I find reliable information about OBD2 wiring for LS swaps?
- What are the benefits of a standalone wiring harness for an LS swap?
- How can I test the OBD2 system after completing the LS swap wiring?
Need Help? Contact us via WhatsApp: +1(641)206-8880, Email: [email protected] or visit us at 789 Elm Street, San Francisco, CA 94102, USA. We offer 24/7 customer support.