Using an Autofix OBD2 scanner can empower you to understand and address your vehicle’s issues. This guide provides a step-by-step approach to using your Autofix OBD2 scanner effectively, from plugging it in to interpreting the codes.
Understanding Your Autofix OBD2 Scanner
Autofix OBD2 scanners are invaluable tools for car owners and professionals alike. They provide a window into your vehicle’s computer system, allowing you to diagnose problems before they escalate. By understanding how to use your Autofix OBD2 scanner, you can save money on costly repairs and maintain your vehicle’s optimal performance.
Locating and Connecting Your OBD2 Port
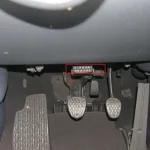
The first step is locating your vehicle’s OBD2 port. This port is typically located under the dashboard on the driver’s side, though it can sometimes be found behind the ashtray or in the center console. Once located, simply plug your Autofix OBD2 scanner into the port. Ensure the connection is secure. You’ll know it’s connected when the scanner powers on. If you are having trouble locating the OBD2 port, consult your vehicle’s owner’s manual or search online for its location specific to your car’s make and model. You might find some useful tips in our article on diy obd2 reader.
Turning on the Ignition
With the scanner connected, turn your vehicle’s ignition to the “on” position. Do not start the engine. This will power the scanner and allow it to communicate with your vehicle’s computer. The scanner’s screen should illuminate and begin initializing.
Reading the Codes
Once initialized, the Autofix OBD2 scanner will begin scanning for trouble codes. This process may take a few moments. Once complete, the scanner will display any detected codes. These codes are standardized and consist of a letter followed by four numbers (e.g., P0301). Write down these codes, as you’ll need them to identify the issue. Looking for more information on specific codes? Check out our article on obd2 code po223.
Interpreting the Codes
Now that you have the codes, you need to interpret them. Most Autofix OBD2 scanners provide a basic description of each code. However, for a more detailed explanation, you can consult a reliable online OBD2 code database or repair manual. Understanding the codes is crucial to diagnosing and fixing the underlying problem.
Clearing the Codes
After addressing the issue, you can use the Autofix OBD2 scanner to clear the codes. This confirms the repair and resets the check engine light. If the check engine light returns, it indicates the problem persists or a new issue has arisen. If you’re interested in OBD2 apps for your phone, check out our article on automatic obd2 apps. For reliable scanner recommendations, see our consumer reports obd2 reader article. You can also find information on reading evap with obd2.
Conclusion
Knowing how to use autofix obd2 is a valuable skill for any car owner. It allows you to proactively address vehicle issues, potentially saving you time and money on repairs. By following these steps and understanding the codes, you can take control of your vehicle’s maintenance and keep it running smoothly.
FAQ
- What does OBD2 stand for?
- Where is the OBD2 port located in my car?
- Can I use any OBD2 scanner with my car?
- What do the codes mean?
- How do I clear the codes after fixing the problem?
- What if the check engine light comes back on?
- Can I use an OBD2 scanner to perform other diagnostics?
Need further assistance? Reach out to our 24/7 customer support team via WhatsApp: +1(641)206-8880, Email: [email protected] or visit us at 789 Elm Street, San Francisco, CA 94102, USA.