The idatalink maestro rr obd2 interface is a popular choice for upgrading the factory radio in a Chevy Tahoe. It retains important vehicle features and allows for seamless integration with aftermarket head units. This article will explore the benefits, installation process, and frequently asked questions surrounding the idatalink maestro rr obd2 chevy tahoe integration.
Why Choose iDatalink Maestro RR for Your Chevy Tahoe?
Upgrading your Chevy Tahoe’s audio system doesn’t mean you have to sacrifice factory features. The iDatalink Maestro RR allows you to retain features like steering wheel controls, OnStar, and parking assist chimes while enjoying the benefits of a modern aftermarket head unit. It acts as a bridge between your vehicle’s data bus and the new stereo, ensuring compatibility and a smooth user experience. This is particularly important in modern vehicles like the Chevy Tahoe, which heavily rely on integrated systems.
Retained Features and Enhanced Functionality
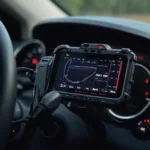
Beyond just retaining existing features, the idatalink maestro rr obd2 chevy tahoe integration can also unlock new functionalities. Depending on your chosen head unit and the maestro module’s capabilities, you can access performance data, gauge readings, and even customize vehicle settings directly from the stereo’s interface.
Installing the iDatalink Maestro RR in Your Chevy Tahoe
While professional installation is recommended, confident DIYers can install the idatalink maestro rr obd2 in their chevy tahoe. The process involves connecting the maestro module to the vehicle’s OBD2 port, the aftermarket radio, and the appropriate wiring harness. Proper wiring is crucial to avoid damaging the vehicle’s electrical system.
Step-by-Step Installation Guide
- Disconnect the negative battery terminal: This is the first and most important step for any car electronics installation.
- Remove the factory radio: Consult your Tahoe’s service manual for specific instructions on removing the dashboard trim and radio.
- Connect the Maestro RR module: Connect the provided wiring harness to the Maestro RR module and then to the vehicle’s wiring harness and the aftermarket radio.
- Flash the Maestro RR module: This step is crucial and requires an internet connection. The Maestro RR needs to be programmed with your vehicle’s specific information and the aftermarket radio you are installing.
- Reconnect the negative battery terminal: After the flashing process is complete, reconnect the battery.
- Test the system: Verify that all retained features and the new stereo are functioning correctly.
Common Installation Challenges and Troubleshooting
One common issue during installation is incorrect flashing of the Maestro RR module. Double-check that you have selected the correct vehicle and radio information before proceeding with the flashing process. Another common challenge is identifying the correct wires in the vehicle’s harness. Referring to a detailed wiring diagram and using a multimeter can help ensure proper connections.
Maximizing the Potential of Your idatalink maestro rr obd2 chevy tahoe Integration
Once installed, the Maestro RR opens up a world of customization options. Explore the settings and features of your new head unit to tailor the system to your specific preferences.
Customizing Your Tahoe’s Infotainment System with Maestro RR
Many aftermarket head units allow you to configure gauge displays, performance data, and even vehicle settings when integrated with the Maestro RR. This level of customization can enhance your driving experience by providing access to vital information at a glance.
Conclusion: Upgrade Your Chevy Tahoe’s Audio System with Confidence
The idatalink maestro rr obd2 interface offers a compelling solution for Chevy Tahoe owners looking to upgrade their factory radio without losing valuable features. By carefully following the installation instructions and understanding the module’s capabilities, you can enjoy a seamless integration of modern technology and retained factory functionality.
FAQ
- Do I need any special tools to install the Maestro RR? Basic hand tools and a multimeter are generally sufficient.
- Can I install the Maestro RR myself, or should I hire a professional? Professional installation is recommended, but confident DIYers can handle the installation.
- What if I encounter problems during the flashing process? Contact iDatalink’s technical support for assistance.
- Will the Maestro RR work with any aftermarket radio? The Maestro RR is compatible with a wide range of aftermarket radios, but it’s crucial to check compatibility before purchasing.
- What happens if I sell my Tahoe after installing the Maestro RR? You can remove the Maestro RR and reinstall the factory radio.
Need Help? Contact us via WhatsApp: +1(641)206-8880, Email: [email protected] or visit us at 789 Elm Street, San Francisco, CA 94102, USA. We have a 24/7 customer support team ready to assist you.